Loops
For Loop
The For loop is the most popular loop. For loops enable us to execute a series of expressions multiple numbers of times. The For loop in VB .NET needs a loop index which counts the number of loop iterations as the loop executes. The syntax for the For loop looks like this:
For index=start to end[Step step]
[statements]
[Exit For]
[statements]
Next[index]
The index variable is set to start automatically when the loop starts. Each time in the loop, index is incremented by step and when index equals end, the loop ends.
Example on For loop
Module Module1
Sub Main()
Dim d As Integer
For d = 0 To 2
System.Console.WriteLine("In the For Loop")
Next d
End Sub
End Module
The image below displays output from above code.
While loop
While loop keeps executing until the condition against which it tests remain true. The syntax of while loop looks like this:
While condition
[statements]
End While
Example on While loop
Module Module1
Sub Main()
Dim d, e As Integer
d = 0
e = 6
While e > 4
e -= 1
d += 1
End While
System.Console.WriteLine("The Loop ran " & e & "times")
End Sub
End Module
The image below displays output from above code.
Do Loop
The Do loop can be used to execute a fixed block of statements indefinite number of times. The Do loop keeps executing it's statements while or until the condition is true. Two keywords, while and until can be used with the do loop. The Do loop also supports an Exit Do statement which makes the loop to exit at any moment. The syntax of Do loop looks like this:
Do[{while | Until} condition]
[statements]
[Exit Do]
[statements]
Loop
Example on Do loop
Module Module1
Sub Main()
Dim str As String
Do Until str = "Cool"
System.Console.WriteLine("What to do?")
str = System.Console.ReadLine()
Loop
End Sub
End Module
The image below displays output from above code.
Popular Posts
-
Now I will show you how to retrieve the data posted from a HTML file in a JSP page. Consider an html page that prompts the user to enter his...
-
Accessing the Standard CGI Variables: To build the successful web application, you often need to know a lot about the environment in which ...
-
INTRODUCTION TO 'C': C is a programming language developed at AT & T's Bell laboratories of USA in 1972.it was designed by d...
-
SQL aliases can be used with database tables and with database table columns, depending on task you are performing. SQL column aliases are u...
-
Learning about Events (Continue) Lets program the Form_Load event. "MsgBox" is Visual Basic command that launch a message box. for...
-
Steps to follow: 1. Write Person.java as shown below in Code-11.3.a under polypackage directory. (You are welcome to do this work using eit...
-
The Command Button's KeyPress, KeyDown and KeyUp Events The events that will be mentioned in the following pages are commonly used, and ...
-
The SQL AVG aggregate function selects the average value for certain table column. Have a look at the SQL AVG syntax: SELECT AVG(Column1) FR...
-
package interfaceexercise; // Define an interface with three abstract methods. // Any class that implements this interface has to // impleme...
-
We will use the Customers table to illustrate the SQL LIKE clause usage: FirstName LastName Email DOB Phone John Smith John.Smith@yaho...
Saturday, March 21, 2009
Conditional Statements in VB.NET
Conditional Statements
If....Else statement
If conditional expression is one of the most useful control structures which allows us to execute a expression if a condition is true and execute a different expression if it is False. The syntax looks like this:
If condition Then
[statements]
Else If condition Then
[statements]
-
-
Else
[statements]
End If
Understanding the Syntax
If the condition is true, the statements following the Then keyword will be executed, else, the statements following the ElseIf will be checked and if true, will be executed, else, the statements in the else part will be executed.
Example
Imports System.Console
Module Module1
Sub Main()
Dim i As Integer
WriteLine("Enter an integer, 1 or 2 or 3")
i = Val(ReadLine())
'ReadLine() method is used to read from console
If i = 1 Then
WriteLine("One")
ElseIf i = 2 Then
WriteLine("Two")
ElseIf i = 3 Then
WriteLine("Three")
Else
WriteLine("Number not 1,2,3")
End If
End Sub
End Module
The image below displays output from above code.
Select....Case Statement
The Select Case statement executes one of several groups of statements depending on the value of an expression. If your code has the capability to handle different values of a particular variable then you can use a Select Case statement. You use Select Case to test an expression, determine which of the given cases it matches and execute the code in that matched case.
The syntax of the Select Case statement looks like this:
Select Case testexpression
[Case expressionlist-n
[statements-n]] . . .
[Case Else elsestatements]
End Select
Example
Imports System.Console
Module Module1
Sub Main()
Dim keyIn As Integer
WriteLine("Enter a number between 1 and 4")
keyIn = Val(ReadLine())
Select Case keyIn
Case 1
WriteLine("You entered 1")
Case 2
WriteLine("You entered 2")
Case 3
WriteLine("You entered 3")
Case 4
WriteLine("You entered 4")
End Select
End Sub
End Module
The image below displays output from above code.
Methods,Sub Procedures
Methods
A Method is a procedure built into the class. They are a series of statements that are executed when called. Methods allow us to handle code in a simple and organized fashion. There are two types of methods in VB .NET: those that return a value (Functions) and those that do not return a value (Sub Procedures). Both of them are discussed below.
Sub Procedures
Sub procedures are methods which do not return a value. Each time when the Sub procedure is called the statements within it are executed until the matching End Sub is encountered. Sub Main(), the starting point of the program itself is a sub procedure. When the application starts execution, control is transferred to Main Sub procedure automatically which is called by default.
Example of a Sub Procedure
Module Module1
Sub Main()
'sub procedure Main() is called by default
Display()
'sub procedure display() which we are creating
End Sub
Sub Display()
System.Console.WriteLine("Using Sub Procedures")
'executing sub procedure Display()
End Sub
End Module
The image below displays output from above code.
Functions
Function is a method which returns a value. Functions are used to evaluate data, make calculations or to transform data. Declaring a Function is similar to declaring a Sub procedure. Functions are declared with the Function keyword. The following code is an example on Functions:
Imports System.Console
Module Module1
Sub Main()
Write("Sum is" & " " & Add())
'calling the function
End Sub
Public Function Add() As Integer
'declaring a function add
Dim i, j As Integer
'declaring two integers and assigning values to them
i = 10
j = 20
Return (i + j)
'performing the sum of two integers and returning it's value
End Function
End Module
The image below displays output from above code.
Calling Methods
A method is not executed until it is called. A method is called by referencing it's name along with any required parameters. For example, the above code called the Add method in Sub main like this:
Write("Sum is" & " " & Add()).
Method Variables
Variables declared within methods are called method variables. They have method scope which means that once the method is executed they are destroyed and their memory is reclaimed. For example, from the above code (Functions) the Add method declared two integer variables i, j. Those two variables are accessible only within the method and not from outside the method.
Parameters
A parameter is an argument that is passed to the method by the method that calls it. Parameters are enclosed in parentheses after the method name in the method declaration. You must specify types for these parameters. The general form of a method with parameters looks like this:
Public Function Add(ByVal x1 as Integer, ByVal y1 as Integer)
------------
Implementation
------------
End Function
Statements and Scope
Statements
A statement is a complete instruction. It can contain keywords, operators, variables, literals, expressions and constants. Each statement in Visual Basic should be either a declaration statement or a executable statement. A declaration statement is a statement that can create a variable, constant, data type. They are the one's we generally use to declare our variables. On the other hand, executable statements are the statements that perform an action. They execute a series of statements. They can execute a function, method, loop, etc.
Option Statement
The Option statement is used to set a number of options for the code to prevent syntax and logical errors. This statement is normally the first line of the code. The Option values in Visual Basic are as follows.
Option Compare: You can set it's value to Text or Binary. This specifies if the strings are compared using binary or text comparison operators.
Option Explicit: Default is On. You can set it to Off as well. This requires to declare all the variables before they are used.
Option Strict: Default is Off. You can set it to On as well. Used normally when working with conversions in code. If you want to assign a value of one type to another then you should set it to On and use the conversion functions else Visual Basic will consider that as an error.
Example of Option Statement
The following code demonstrates where to place the Option statement.
Option Strict Off
Imports System
Module Module 1
Sub Main ()
Console.WriteLine (“Using Option”)
End Sub
End Module
The following code throws an error because Option Strict is On and the code attempts to convert a value of type double to integer.
Option Strict On
Imports System.Console
Module Module2
Sub Main()
Dim i As Integer
Dim d As Double = 20.12
i = d
WriteLine(i)
End Sub
End Module
We always should program with Option Strict On. Doing so allows us to catch many errors at compile time that would otherwise be difficult to track at run time.
Imports Statement
The Imports statement is used to import namespaces. Using this statement prevents you to list the entire namespace when you refer to them.
Example of Imports Statement
The following code imports the namespace System.Console and uses the methods of that namespace preventing us to refer to it every time we need a method of this namespace.
Imports System.Console
Module Module1
Sub Main()
Write("Imports Statement")
WriteLine("Using Import")
End Sub
End Module
The above two methods without an imports statement would look like this: System.Console.Write("Imports Statement") and System.Console.WriteLine("Using Import")
With Statement
With statemnt is used to execute statements using a particular object. The syntax looks like this:
With object
[statements]
End With
Sample Code
The following code sets text and width for a button using the With Statement.
Private Sub Form1_Load(ByVal sender As System.Object, ByVal e As System.EventArgs)_
Handles MyBase.Load
With Button1
.Text = "With Statement"
.Width = 150
End With
End Sub
Boxing
Boxing is implicit conversion of value types to reference types. Recall that all classes and types are derived from the Object class. Because they are derived from Object class they can be implicitly converted to that type. The following sample shows that:
Dim x as Integer=20
'declaring an integer x
Dim o as Object
'declaring an object
o=x
converting integer to object
Unboxing is the conversion of a boxed value back to a value type.
Scope
The scope of an element in code is all the code that can refer to it without qualifying it's name. Stated other way, an element's scope is it's accessibility in code. Scope is normally used when writing large programs as large programs divide code into different classes, modules, etc. Also, scope prevents the chance of code referring to the wrong item. The different kinds of scope available in VB .NET are as follows:
Block Scope: The element declared is available only within the code block in which it is declared.
Procedure Scope: The element declared is available only within the procedure in which it is declared.
Module Scope: The element is available to all code within the module and class in which it is declared.
Namespace Scope: The element declared is available to all code in the namespace.
Data Types, Access Specifiers
Data Types in VB .NET
The Data types available in VB .NET, their size, type, description are summarized in the table below.
Access Specifiers
Access specifiers let's us specify how a variable, method or a class can be used. The following are the most commonly used one's:
Public: Gives variable public access which means that there is no restriction on their accessibility
Private: Gives variable private access which means that they are accessible only within their declaration content
Protected: Protected access gives a variable accessibility within their own class or a class derived from that class
Friend: Gives variable friend access which means that they are accessible within the program that contains their declaration
Protected Friend: Gives a variable both protected and friend access
Static: Makes a variable static which means that the variable will hold the value even the procedure in which they are declared ends
Shared: Declares a variable that can be shared across many instances and which is not associated with a specific instance of a class or structure
ReadOnly: Makes a variable only to be read and cannot be written
Variables
Variables are used to store data. A variable has a name to which we refer and the data type, the type of data the variable holds. VB .NET now needs variables to be declared before using them. Variables are declared with the Dim keyword. Dim stands for Dimension.
Example
Imports System.Console
Module Module1
Sub Main()
Dim a,b,c as Integer
'declaring three variables of type integer
a=10
b=20
c=a+b
Write("Sum of a and b is" & c)
End Sub
End Module
The Data types available in VB .NET, their size, type, description are summarized in the table below.
Data Type | Size in Bytes | Description | Type |
Byte | 1 | 8-bit unsigned integer | System.Byte |
Char | 2 | 16-bit Unicode characters | System.Char |
Integer | 4 | 32-bit signed integer | System.Int32 |
double | 8 | 64-bit floating point variable | System.Double |
Long | 8 | 64-bit signed integer | System.Int64 |
Short | 2 | 16-bit signed integer | System.Int16 |
Single | 4 | 32-bit floating point variable | System.Single |
String | varies | Non-Numeric Type | System.String |
Date | 8 | /td> | System.Date |
Boolean | 2 | Non-Numeric Type | System.Boolean |
Object | 4 | Non-Numeric Type | System.Object |
Decimal | 16 | 128-bit floating point variable | System.Decimal |
Access Specifiers
Access specifiers let's us specify how a variable, method or a class can be used. The following are the most commonly used one's:
Public: Gives variable public access which means that there is no restriction on their accessibility
Private: Gives variable private access which means that they are accessible only within their declaration content
Protected: Protected access gives a variable accessibility within their own class or a class derived from that class
Friend: Gives variable friend access which means that they are accessible within the program that contains their declaration
Protected Friend: Gives a variable both protected and friend access
Static: Makes a variable static which means that the variable will hold the value even the procedure in which they are declared ends
Shared: Declares a variable that can be shared across many instances and which is not associated with a specific instance of a class or structure
ReadOnly: Makes a variable only to be read and cannot be written
Variables
Variables are used to store data. A variable has a name to which we refer and the data type, the type of data the variable holds. VB .NET now needs variables to be declared before using them. Variables are declared with the Dim keyword. Dim stands for Dimension.
Example
Imports System.Console
Module Module1
Sub Main()
Dim a,b,c as Integer
'declaring three variables of type integer
a=10
b=20
c=a+b
Write("Sum of a and b is" & c)
End Sub
End Module
Console Applications
Console Applications are command-line oriented applications that allow us to read characters from the console, write characters to the console and are executed in the DOS version. Console Applications are written in code and are supported by the System.Console namespace.
Example on a Console Application
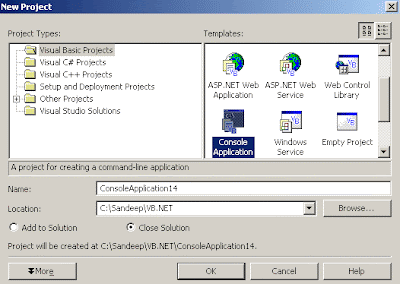
Create a folder in C: drive with any name (say, examples) and make sure the console applications which you open are saved there. That's for your convenience. The default location where all the .NET applications are saved is C:\Documents and Settings\Administrator\My Documents\Visual Studio Projects. The new project dialogue looks like the image below.
The following code is example of a console application:
Module Module1
Sub Main()
System.Console.Write("Welcome to Console Applications")
End Sub
End Module
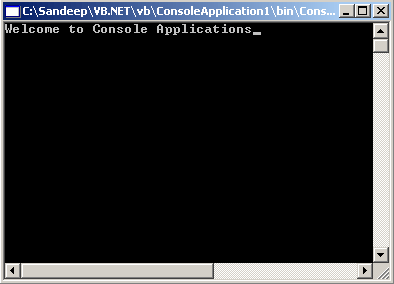
You run the code by selecting Debug->Start from the main menu or by pressing F5 on the keyboard. The result "Welcome to Console Applications" displayed on a DOS window. Alternatively, you can run the program using the VB compiler (vbc). To do that, go to the Visual Studio. NET command prompt selecting from
Start->Programs->Visual Studio.NET->Visual Studio.NET Tools->Visual Studio.NET Command Prompt and type:
c:\examples>vbc example1.vb.
The result, "Welcome to Console Applications" is displayed on a DOS window as shown in the image below.
Breaking the Code to understand it
Note the first line, we're creating a Visual Basic Module and Modules are designed to hold code. All the code which we write should be within the Module.
Next line starts with Sub Main(), the entry point of the program.
The third line indicates that we are using the Write method of the System.Console class to write to the console.
Commenting the Code
Comments in VB.NET begin with a single quote (') character and the statements following that are ignored by the compiler. Comments are generally used to specify what is going on in the program and also gives an idea about the flow of the program. The general form looks like this:
Dim I as Integer
'declaring an integer
Code
VB Language
VB Language
Visual Basic, the name makes me feel that it is something special. In the History of Computing world no other product sold more copies than Visual Basic did. Such is the importance of that language which clearly states how widely it is used for developing applications. Visual Basic is very popular for it's friendly working (graphical) environment. Visual Basic. NET is an extension of Visual Basic programming language with many new features in it. The changes from VB to VB .NET are huge, ranging from the change in syntax of the language to the types of projects we can create now and the way we design applications. Visual Basic .NET was designed to take advantage of the .NET Framework base classes and runtime environment. It comes with power packed features that simplify application development.
Briefly on some changes:
The biggest change from VB to VB .NET is, VB .NET is Object-Oriented now. VB .NET now supports all the key OOP features like Inheritance, Polymorphism, Abstraction and Encapsulation. We can now create classes and objects, derive classes from other classes and so on. The major advantage of OOP is code reusability
The Command Button now is Button and the TextBox is TextBox instead of Text as in VB6
Many new controls have been added to the toolbar to make application development more efficient
VB .NET now adds Console Applications to it apart from Windows and Web Applications. Console applications are console oriented applications that run in the DOS version
All the built-in VB functionality now is encapsulated in a Namespace (collection of different classes) called System
New keywords are added and old one's are either removed or renamed
VB .NET is strongly typed which means that we need to declare all the variables by default before using them
VB .NET now supports structured exception handling using Try...Catch...Finally syntax
The syntax for procedures is changed. Get and Let are replaced by Get and Set
Event handling procedures are now passed only two parameters
The way we handle data with databases is changed as well. VB .NET now uses ADO .NET, a new data handling model to communicate with databases on local machines or on a network and also it makes handling of data on the Internet easy. All the data in ADO .NET is represented in XML format and is exchanged in the same format. Representing data in XML format allows us for sending large amounts of data on the Internet and it also reduces network traffic when communicating with the database
VB .NET now supports Multithreading. A threaded application allows to do number of different things at once, running different execution threads allowing to use system resources
Web Development is now an integral part of VB .NET making Web Forms and Web Services two major types of applications
Namespaces
A namespace is a collection of different classes. All VB applications are developed using classes from the .NET System namespace. The namespace with all the built-in VB functionality is the System namespace. All other namespaces are based on this System namespace.
Some Namespaces and their use:
System: Includes essential classes and base classes for commonly used data types, events, exceptions and so on
System.Collections: Includes classes and interfaces
that define various collection of objects such as list, queues,
hash tables, arrays, etc
System.Data: Includes classes which lets us handle data from data sources
System.Data.OleDb: Includes classes that support the OLEDB .NET provider
System.Data.SqlClient: Includes classes that support the SQL Server .NET provider
System.Diagnostics: Includes classes that allow to debug our application and to step through our code
System.Drawing: Provides access to drawing methods
System.Globalization: Includes classes that specify culture-related information
System.IO: Includes classes for data access with Files
System.Net: Provides interface to protocols used on the internet
System.Reflection: Includes classes and interfaces that return information about types, methods and fields
System.Security: Includes classes to support the structure of common language runtime security system
System.Threading: Includes classes and interfaces to support multithreaded applications
System.Web: Includes classes and interfaces that support browser-server communication
System.Web.Services: Includes classes that let us build and use Web Services
System.Windows.Forms: Includes classes for creating Windows based forms
System.XML: Includes classes for XML support
Assemblies
An assembly is the building block of a .NET application. It is a self describing collection of code, resources, and metadata (data about data, example, name, size, version of a file is metadata about that file). An Assembly is a complied and versioned collection of code and metadata that forms an atomic functional unit. Assemblies take the form of a dynamic link library (.dll) file or executable program file (.exe) but they differ as they contain the information found in a type library and the information about everything else needed to use an application or component. All .NET programs are constructed from these Assemblies. Assemblies are made of two parts: manifest, contains information about what is contained within the assembly and modules, internal files of IL code which are ready to run. When programming, we don't directly deal with assemblies as the CLR and the .NET framework takes care of that behind the scenes. The assembly file is visible in the Solution Explorer window of the project.
An assembly includes:
* Information for each public class or type used in the assembly – information includes class or type names, the classes from which an individual class is derived, etc
* Information on all public methods in each class, like, the method name and return values (if any)
* Information on every public parameter for each method like the parameter's name and type
* Information on public enumerations including names and values
* Information on the assembly version (each assembly has a specific version number)
* Intermediate language code to execute
* A list of types exposed by the assembly and list of other assemblies required by the assembly
Image of a Assembly file is displayed below.
Using SQL Parameters in VB.NET
Using SQL Parameters
In VB.NET, we have Windows controls that may provide parameters for filtering data from the database. A common scenario might be searching for some data from the Windows form and then populating a DataGrid with the results. Sql Parameters help us to filter data. We will follow the usage of Sql Parameters in VB .NET with a sample application. To start, open a blank Microsoft Access database, name it as Sample. Create a table, Table1 in Sample database with the columns, Business Name, Name, Order ID and State. Enter some values in the table and close it. Make sure you enter atleast 3 different state names when you fill the table with values. The following sample application will use two data adapters and two datasets to let the user select a state from a ComboBox and display data relating to that state in a data grid. When the form loads, the states from the table load into the dataset bound to the combo box. The user can select a state from the combo box and click the load button on the form to load all the data relating to that state into a second dataset, whose data is displayed in a data gird.
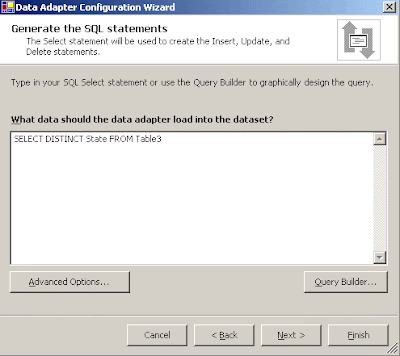
Loading the state data from table1 is fairly simple with the first data adapter. Drag a OleDb Data Adapter from the data tab of the toolbox onto the form. The Data Adapter Configuration Wizard opens and you are required to configure it. You can have a look at the Data Adapter Configuration Wizard here. While configuring the data adapter, the Generate Sql Statements dialog box should be as follows: Select DISTINCT State from Table1 as shown in the image below.
Note that we used the DISTINCT keyword in the SQL Statement above. The distinct keyword is used to load a unique state in the dataset. No state will be displayed more than once. After you finish configuring the data adapter, you need to generate the dataset. To generate a dataset, DataSet11 select Data->Generate Dataset from the main menu.
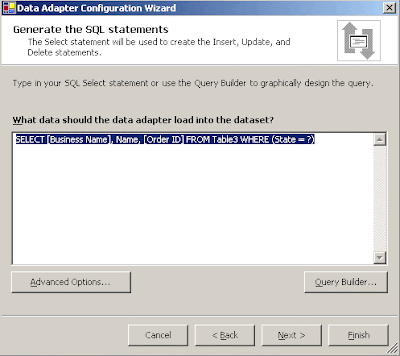
After the user selects a state in the ComboBox and clicks the load button the data should load into the data grid. To load data into the data grid you need to use the second data adapter, OleDb DataAdapter2. From the data tab of the toolbox drag an OleDb DataAdapter, OleDb Data Adapter2 onto the form and configure it. While configuring the data adapter the Generate Sql Statements dialog box should be as follows:
Select Business Name, Name, Order ID from Table1 WHERE (state=?) as shown in the image below.
Note the above said line of code. Here, we are using the SQL Parameter indicated by the ? mark for the state field in a WHERE clause in the SQL for the second data adapter. The Sql Parameter used will display data related to the state we select in the combo box in the data grid. After you finish configuring the data adapter, you need to generate the dataset. To generate a dataset, DataSet21 select Data->Generate Dataset from the main menu.
Now, drag a ComboBox, a Button and a DataGrid control onto a new form. Select the ComboBox, open it's properties and set the DataSource property to DataSet11 and DisplayMember property to Table1.State. Select the DataGrid and in the properties window set the DataMember property to Table1 and DataSource property to DataSet21. Switch to code view and paste following code.
Private Sub Form2_Load(ByVal sender As System.Object,_
ByVal e As System.EventArgs) Handles MyBase.Load
DataSet11.Clear()
OleDbDataAdapter1.Fill(DataSet11)
End Sub
Private Sub Button1_Click(ByVal sender As System.Object,_
ByVal e As System.EventArgs) Handles Button1.Click
OleDbDataAdapter2.SelectCommand.Parameters("state").Value = ComboBox1.Text
'placing a value into the SQL parameter corresponding to the state field
DataSet21.Clear()
OleDbDataAdapter2.Fill(DataSet21)
End Sub
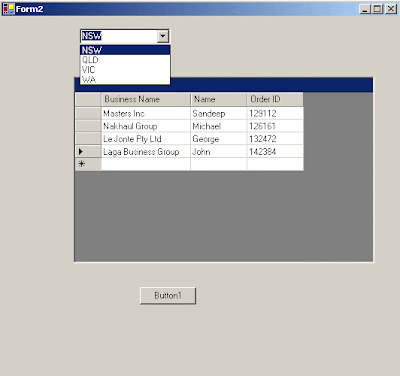
After you are done with the code run the form, select a state from the ComboBox and click the button. The data relating to that particluar state will be displayed in the datagrid as shown in the image below.
Creating Data Table In VB.NET
Creating DataTable
Visual Basic allows us to create our own Tables and work with them. The DataTable is an in-memory representation of a block of data. We can create our own tables in code using a DataSet and the types defined in the System.Data.OleDb or System.Data.SqlClient namespaces. The following are the core properties that are used while creating a DataTable.
CaseSensitive: Indicates whether string comparisons in the table are case-sensitive or not.
ChildRelations: Returns the collection of child relations of the DataTable (if any).
Columns: Returns the collection of columns that belong to this table.
Constraints: Gets the constraints maintained by this table.
DataSet: Gets the dataset that contains this table.
DefaultView: Gets a customized view of the table that may include a filtered view or a cursor position.
MinimumCapacity: Gets/Sets the initial number of rows in the table.
ParentRelations: Gets the collection of parent relations for this table.
PrimaryKey: Gets/Sets a primary key for the table.
Rows: Returns the collection of rows that belong to this table.
TableName: Gets/Sets the name of the table.
Creating a DataTable in Code
Let's see how we can create a DataTable in code. Open a new form and drag a Button and a DataGrid from the toolbox. We will load the table which we create in code into the DataGrid once the Button is clicked. We will create a DataTable named "Customers" , with "Name", "Product" and "Location" as three columns in the table. We will create three rows and three columns for this table. The following code shows how to create a table and load the table into the DataGrid.
Public Class Form1 Inherits System.Windows.Forms.Form
Private Sub Form1_Load(ByVal sender As System.Object, ByVal e As System.EventArgs)_
Handles MyBase.Load
End Sub
Private Sub Button1_Click(ByVal sender As System.Object, ByVal e As_
System.EventArgs) Handles Button1.Click
Dim Table1 As DataTable
Table1 = New DataTable("Customers")
'creating a table named Customers
Dim Row1, Row2, Row3 As DataRow
'declaring three rows for the table
Try
Dim Name As DataColumn = New DataColumn("Name")
'declaring a column named Name
Name.DataType = System.Type.GetType("System.String")
'setting the datatype for the column
Table1.Columns.Add(Name)
'adding the column to table
Dim Product As DataColumn = New DataColumn("Product")
Product.DataType = System.Type.GetType("System.String")
Table1.Columns.Add(Product)
Dim Location As DataColumn = New DataColumn("Location")
Location.DataType = System.Type.GetType("System.String")
Table1.Columns.Add(Location)
Row1 = Table1.NewRow()
'declaring a new row
Row1.Item("Name") = "Reddy"
'filling the row with values. Item property is used to set the field value.
Row1.Item("Product") = "Notebook"
'filling the row with values. adding a product
Row1.Item("Location") = "Sydney"
'filling the row with values. adding a location
Table1.Rows.Add(Row1)
'adding the completed row to the table
Row2 = Table1.NewRow()
Row2.Item("Name") = "Bella"
Row2.Item("Product") = "Desktop"
Row2.Item("Location") = "Adelaide"
Table1.Rows.Add(Row2)
Row3 = Table1.NewRow()
Row3.Item("Name") = "Adam"
Row3.Item("Product") = "PDA"
Row3.Item("Location") = "Brisbane"
Table1.Rows.Add(Row3)
Catch
End Try
Dim ds As New DataSet()
ds = New DataSet()
'creating a dataset
ds.Tables.Add(Table1)
'adding the table to dataset
DataGrid1.SetDataBinding(ds, "Customers")
'binding the table to datagrid
End Sub
End Class
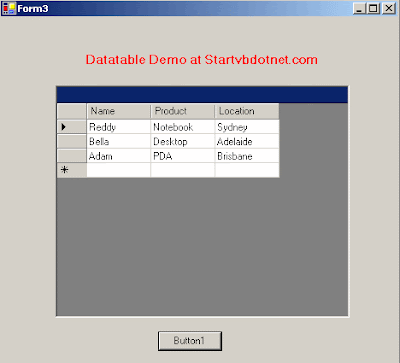
When you run the above code and click the Button, a table is created and the created table loads into the DataGrid. You can add any number of rows and columns to the table. I added only three for the purpose of explanation. Other DataType values supported are: System.Boolean, System.Byte, System.Char, System.DateTime, System.Decimal, System.Double, System.Int16, System.Int32, System.Int64, System.SByte, System.Single. You can use any one of the above said data types depending on the type of data you will have in the columns.
The image below displays output from above code.
Data Form Wizard,Data Binding
Data Form Wizard
Visual Basic also allows us to work with DataBinding with it's built-in feature "Data Form Wizard". We will have a look at how we can create our own data-entry forms with the Data Form Wizard. A Data Form Wizard is the easiest and fastest way to develop database applications without writing a single line of code. We will create a form and work with Order Details table from the sample Northwind database in SQLServer. To start working, select Project->Add New Item->Data Form Wizard from the main menu. The dialogue box for that looks like the image below.
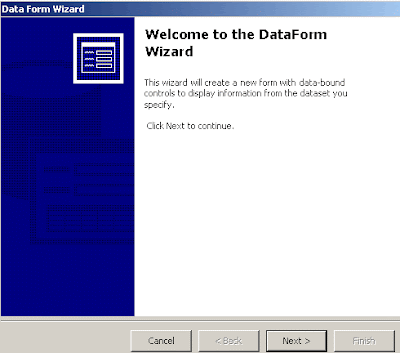
After selecting Data Form Wizard, click Open. The new pane that opens is the DataForm Wizard and it looks like the image below.
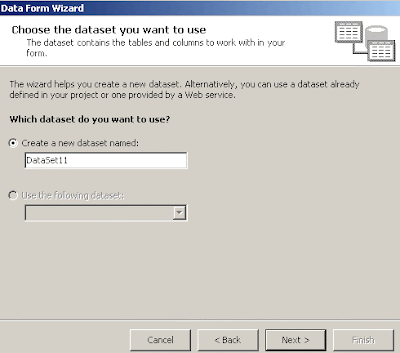
Click Next on this pane. Clicking next takes you to a new pane which looks like the image below. Here you need to specify the name for your DataSet.
Here, select the radio button that displays "Create a new dataset named", type a name for the DataSet, and click next. Clicking next opens a pane like the image below.
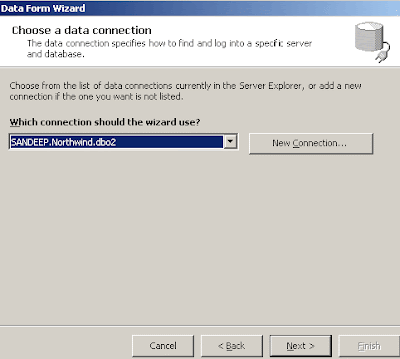
Here we need to establish a connection to the database. Click on the "New Connection" button to open the "Data Link Properties" window. Set a connection to the database in the Data Link properties window. Here, I am using Northwind database. You can use any database you wish to work with. If you already have a connection you can use it. Once you finish with the Connection, click next. Clicking next takes you to a new pane like the image below.
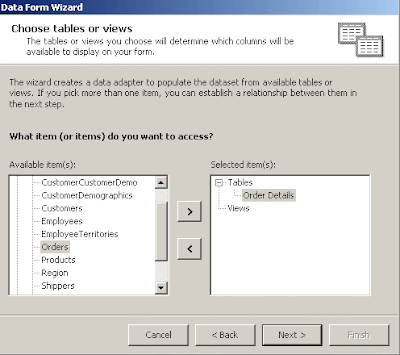
This pane displays all the tables available in Northwind database. Select the table you want to work and add it using the forward arrow button. I am selecting the Order Details table. Click next once you are finished. The next pane looks like the image below.
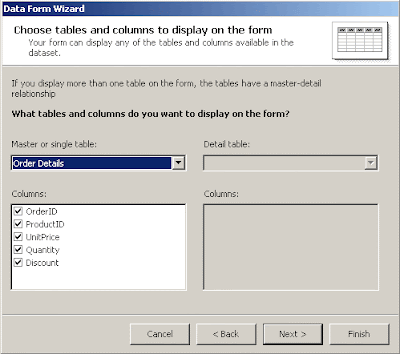
This pane allows us to display columns from more than one table by establishing a master-detail relationship. Since we are working with one table, click next on this window. Clicking next takes us to a pane like the image below.
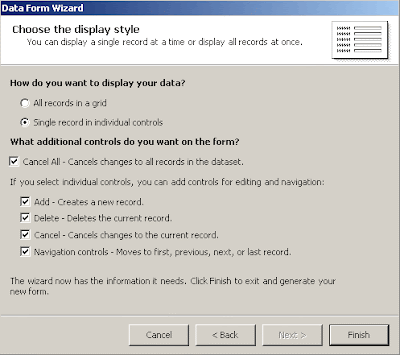
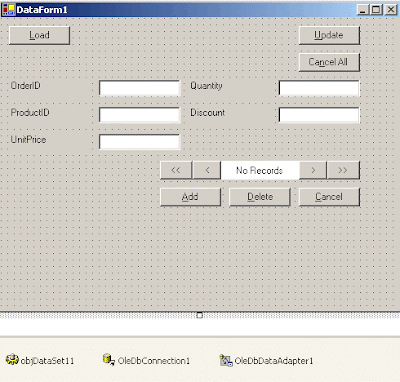
This pane allows us to choose the display style for data. By default all the records are set to be displayed in a data grid. Here, select the radio button which says "Single records in individual controls" which will unlock all the checkboxes. Uncheck the check box where it says "Cancel All" and click finish. Clicking finish adds the Data Entry Form with all the required textboxes and navigation controls (buttons). The image below displays that.
Run the form and click the Load button located at the top of the form to load the data into the form. Using the navigation controls you can move to the next record, last record, previous record and the first record. You can also enter/delete/update data into the table. Type text in the textboxes and click the insert button to insert data into the table or select a record and delete it or make changes to a record and update it by clicking the appropriate buttons. Also open the code behind file to take a look at the code Visual Basic generated for us.
Simple Binding
Simple Binding
Generating DataSet
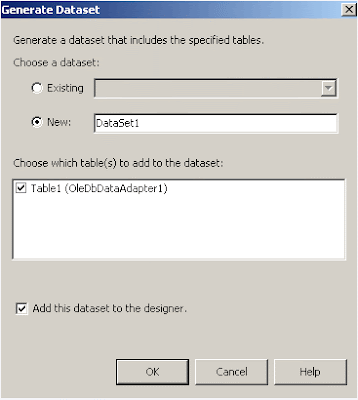
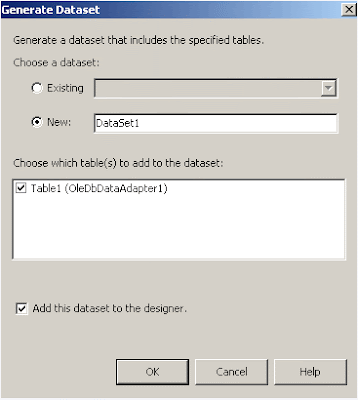
To generate a DataSet, select Data->Generate DataSet from the main menu. From the dialog that opens, as shown in the image below, select new and check the checkbox for Table1 and also check the checkbox where it says "add this dataset to the designer" and click OK. Once you click OK, you can see the DataSet, DataSet11 being added to the component tray.
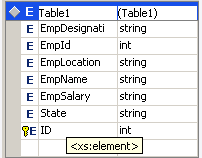
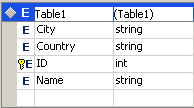
You can also see the XML schema file named DataSet1.xsd that is generated to define the DataSet. You can double-click this file in Solution Explorer window if you want to see the schema code. This file is generated because ADO .NET transfers data in XML format. The image below displays that.
Binding Controls to the DataSet
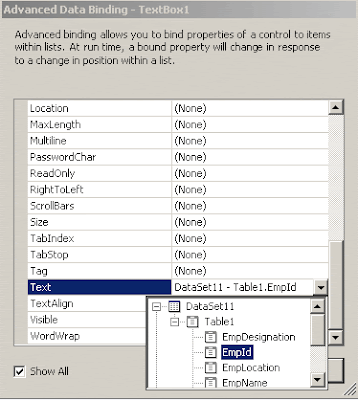
We are now ready to bind textboxes to this dataset. We will bind the text property of textboxes to data columns in table1. Select TextBox1, open it's properties and under Data Bindings, select Advanced and click on the ellipse to open the Advanced Data Binding window for the textbox. It looks like the image below.
As shown in the image above, select Text property, click on the drop-down arrow, double-click DataSet11 which opens Table1. Double-click Table1 to list all columns in the table. Here, you select the column you want to display in this textbox. Once you finish selecting the column click close. Repeat the process for remaining textboxes until all columns in Table1 are accommodated. Once you finish with all textboxes, we need to write code for buttons to finish our data-entry form. Switch to code view and place the following code. Make sure you place code correctly for each button.
Public Class Form1 Inherits System.Windows.Forms.Form
#Region " Windows Form Designer generated code "
#End Region
Private Sub Form1_Load(ByVal sender As System.Object, ByVal e As System.EventArgs)_
Handles MyBase.Load
'data binding demo
End Sub
Private Sub Load_Click(ByVal sender As System.Object, ByVal e As _
System.EventArgs) Handles Load.Click
OleDbDataAdapter1.Fill(DataSet11)
'filling the dataset and loading records into the textboxes
End Sub
Private Sub Update_Click(ByVal sender As System.Object, ByVal e As _
System.EventArgs) Handles Update.Click
Try
Me.BindingContext(DataSet11, "table1").EndCurrentEdit()
Me.OleDbDataAdapter1.Update(DataSet11)
'ending current editing and updating the dataset
Catch
End Try
End Sub
Private Sub Insert_Click(ByVal sender As System.Object, ByVal e As _
System.EventArgs) Handles Insert.Click
Me.BindingContext(DataSet11, "table1").AddNew()
'adding new record/row to the table
MsgBox("Successfully Inserted")
End Sub
Private Sub Clear_Click(ByVal sender As System.Object, ByVal e As _
System.EventArgs) Handles Clear.Click
TextBox1.Text = " "
TextBox2.Text = " "
TextBox3.Text = " "
TextBox4.Text = " "
TextBox5.Text = " "
'setting all textboxes to null
End Sub
Private Sub First_Click(ByVal sender As System.Object, ByVal e As _
System.EventArgs) Handles First.Click
Me.BindingContext(DataSet11, "table1").Position = 0
'using forms's BindingContext property's position member and setting it to 0
'displays the first row from table
End Sub
Private Sub NextRec_Click(ByVal sender As System.Object, ByVal e As _
System.EventArgs) Handles NextRec.Click
Me.BindingContext(DataSet11, "table1").Position = Me.BindingContext(DataSet11,_
"table1"). Position + 1
'incrementing the position property of the binding context
End Sub
Private Sub Previous_Click(ByVal sender As System.Object, ByVal e As _
System.EventArgs) Handles Previous.Click
Me.BindingContext(DataSet11, "table1").Position = Me.BindingContext(DataSet11,_
"table1"). Position - 1
End Sub
Private Sub Last_Click(ByVal sender As System.Object, ByVal e As _
System.EventArgs) Handles Last.Click
Me.BindingContext(DataSet11, "table1").Position = Me.BindingContext(DataSet11,_
"table1"). Count - 1
'the count property returns the total number of records in the table
End Sub
End Class
After finishing with the code, run the application
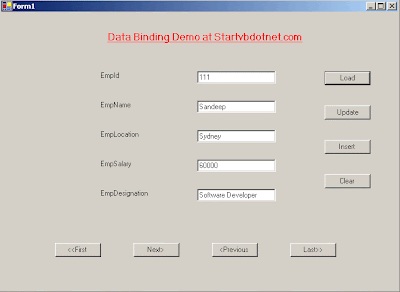
and click Load button. The first row from table1 will be displayed in textboxes. The image below displays that.
After finishing with the code, run the application and click Load button. The first row from table1 will be displayed in textboxes. The image below displays that.
You can now move to the last row, next row, previous row, etc or modify your records, insert new records etc. Try experimenting with other controls following the same procedure.
CurrencyManager Object
Based on the code above, this is for understanding. Navigation of records and updating of data-bound controls is managed in the data layer as discussed above. Every data source manages navigation with a CurrencyManager object. The CurrencyManager object keeps track of a current record for a particular data source. An application can interact with more than one data source at a given time. Each data source maintains it's own CurrencyManager. Since there can be multiple data sources represented on a single form at any given time, each form manages the CurrencyManager objects associated with those data sources through the central object called the BindingContext. The BindingContext organizes and exposes the CurrencyManager objects associated with each data source. We can use the BindingContext property of each form to manage the position of each record for data source. We access a particular CurrencyManager by supplying the BindingContext property of the CurrencyManager. When navigating records, the current record can be set by setting the Position property for a particular BindingContext.
Simple Binding in Code
We can also perform simple binding in code using the control's DataBindings property. Say, we want to bind the textbox to the EmpID column in code. We can do that using the collection's Add method by passing this method the property to bind, the data source to use and the specific column we want to bind. The code for that looks like this:
TextBox1.DataBindings.Add("Text", DataSet11, "table1.empid").
Simple Data Binding With ADO.NET
Simple Binding
Data Binding
Data Binding is binding controls to data from the database. With data binding we can bind a control to a particular column in a table from the database or we can bind the whole table to the data grid. Data binding provides simple, convenient, and powerful way to create a read/write link between the controls on a form and the data in their application. Windows Forms supports binding data to ADO .NET DataSet, Array, ArrayList, etc. A control can be bound to any collection that supports indexed access to the elements in that collection.
Simple Data Binding
Simple binding allows us to display one data element from a table in a control. Simple binding is managed by use of the Bindings collection on each control. Simple bound controls show only one data element at a time. We have to create our own navigation controls (buttons) to see other data elements. These navigation controls allow us to move from record to record by clicking buttons and the data in the bound controls will be updated automatically. To bind any property of a control, you need to click the ellipse button of the Advanced property under Data Bindings property in the properties window. Clicking on the ellipse opens up Advanced Data Binding Dialog in which we can bind any property of a control to a data source.
Working with Example
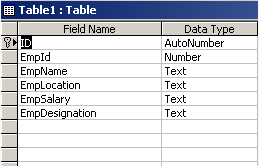
To understand Simple Binding we will create a simple data entry form and work with it. We will create our own table in Access and access data from that table with a Form. To start, open a blank database in MS Access, name it as Emp and save it in the C: drive of your machine. Create a table, Table1 with the following columns, EmpId, EmpName, EmpLocation, EmpSalary and EmpDesignation. The columns and their data types should look like the image below.
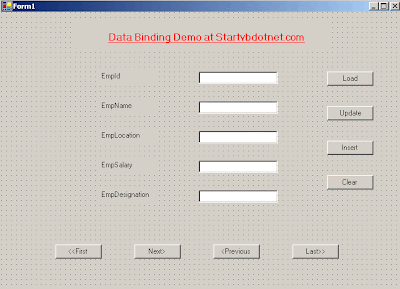
Once you finish creating the table with required columns, enter some values and close it. Get back to Visual Studio, open a new Windows Form and from the toolbox add five TextBoxes, five Labels and eight Buttons. Here, we will bind data from the table we created in Access to TextBoxes. TextBox1 will display EmpId, TextBox2 will display EmpName, TextBox3 will display EmpLocation, TextBox4 will display EmpSalary and TextBox5 will display EmpDesignation. The image below displays the form in design view.
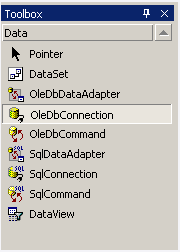
Set the text and name property of all the buttons as shown above in the properties window. Now, in the toolbox, click the Data tab and drag an OleDbConnection object onto the form. The image below displays items from the Data tab.
href="https://blogger.googleusercontent.com/img/b/R29vZ2xl/AVvXsEjG77l3rMbu6X2jfqU316Pm3kSXtAt4h7EpBukx4kj5VJwdF5xOiFyPoN-GYvJnvO4ek1J61_r7AYbjTm8Vr71JEUxRavbl7Shek9dOo7_nY2-iJagRythVJTKN6w9ujfNV0DoiFLBHHzB6/s1600-h/sb3.gif">
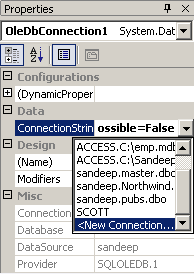
Once the connection object is added to the component tray, open it's properties window to set the connection string. Select ConnectionString property in the properties window, click on the drop-down arrow and select item. That looks like the image below.
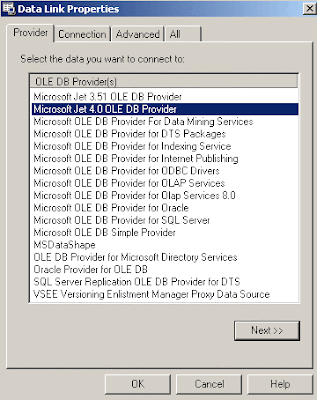
When you select, it opens the Data Link Properties dialog box. Click on Provider tab in this box and select "Microsoft Jet 4.0 OLE DB Provider". By default it selects provider for SQL Server. After selecting MS Jet, click Next. The image below displays the Data Link properties dialog.
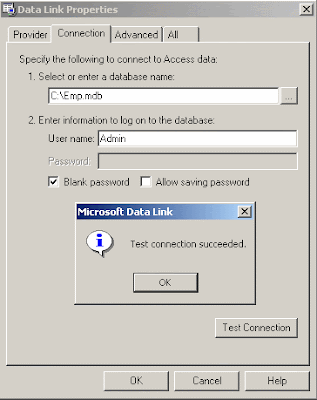
Clicking next takes you to Connection tab. Here, browse for Emp.mdb database in the selection area by clicking the ellipse button and click "Test Connection" button. If connection succeeds, it displays a message box stating that the connection succeeded. The image below displays that.
Once you are done with it, click OK. Until this point we created a Connection object that knows how to connect to the database. We still need other objects that will make use of this connection. Get back to the Data tab in toolbox and drag an OleDbDataAdapter tool onto the Form. This adds a new data adapter to the form and automatically starts the Data Adapter Configuration Wizard. You can view configuration of data adapter here. After you finish configuring the data adapter we need to create a Dataset.
continue reading
Data Binding
Data Binding is binding controls to data from the database. With data binding we can bind a control to a particular column in a table from the database or we can bind the whole table to the data grid. Data binding provides simple, convenient, and powerful way to create a read/write link between the controls on a form and the data in their application. Windows Forms supports binding data to ADO .NET DataSet, Array, ArrayList, etc. A control can be bound to any collection that supports indexed access to the elements in that collection.
Simple Data Binding
Simple binding allows us to display one data element from a table in a control. Simple binding is managed by use of the Bindings collection on each control. Simple bound controls show only one data element at a time. We have to create our own navigation controls (buttons) to see other data elements. These navigation controls allow us to move from record to record by clicking buttons and the data in the bound controls will be updated automatically. To bind any property of a control, you need to click the ellipse button of the Advanced property under Data Bindings property in the properties window. Clicking on the ellipse opens up Advanced Data Binding Dialog in which we can bind any property of a control to a data source.
Working with Example
To understand Simple Binding we will create a simple data entry form and work with it. We will create our own table in Access and access data from that table with a Form. To start, open a blank database in MS Access, name it as Emp and save it in the C: drive of your machine. Create a table, Table1 with the following columns, EmpId, EmpName, EmpLocation, EmpSalary and EmpDesignation. The columns and their data types should look like the image below.
Once you finish creating the table with required columns, enter some values and close it. Get back to Visual Studio, open a new Windows Form and from the toolbox add five TextBoxes, five Labels and eight Buttons. Here, we will bind data from the table we created in Access to TextBoxes. TextBox1 will display EmpId, TextBox2 will display EmpName, TextBox3 will display EmpLocation, TextBox4 will display EmpSalary and TextBox5 will display EmpDesignation. The image below displays the form in design view.
Set the text and name property of all the buttons as shown above in the properties window. Now, in the toolbox, click the Data tab and drag an OleDbConnection object onto the form. The image below displays items from the Data tab.
href="https://blogger.googleusercontent.com/img/b/R29vZ2xl/AVvXsEjG77l3rMbu6X2jfqU316Pm3kSXtAt4h7EpBukx4kj5VJwdF5xOiFyPoN-GYvJnvO4ek1J61_r7AYbjTm8Vr71JEUxRavbl7Shek9dOo7_nY2-iJagRythVJTKN6w9ujfNV0DoiFLBHHzB6/s1600-h/sb3.gif">
Once the connection object is added to the component tray, open it's properties window to set the connection string. Select ConnectionString property in the properties window, click on the drop-down arrow and select
When you select
Clicking next takes you to Connection tab. Here, browse for Emp.mdb database in the selection area by clicking the ellipse button and click "Test Connection" button. If connection succeeds, it displays a message box stating that the connection succeeded. The image below displays that.
Once you are done with it, click OK. Until this point we created a Connection object that knows how to connect to the database. We still need other objects that will make use of this connection. Get back to the Data tab in toolbox and drag an OleDbDataAdapter tool onto the Form. This adds a new data adapter to the form and automatically starts the Data Adapter Configuration Wizard. You can view configuration of data adapter here. After you finish configuring the data adapter we need to create a Dataset.
continue reading
Data Adapter Configuration Wizard
Generating DataSet
To create a DataSet, select Data->Generate DataSet from the main menu. From the dialogue that opens, select new and check the checkbox for Table1 and also check the checkbox where it says "add this dataset to the designer" and click OK. Once you click OK you can see the DataSet, DataSet11 being added to the component tray. The image below displays generate dataset dialogue.
You can also see the XML schema file named DataSet1.xsd that is generated to define the DataSet. You can double-click this file in Solution Explorer window if you want to see the schema code. This file is generated because ADO .NET transfers data in XML format. The image below displays that.
Now, in the properties window for DataGrid, select the DataSource property. The DataSource displays the DataSet which we generated. Select DataSet11 from the list and in the DataMember property select Tabel1. The following lines of code will fill the DataGrid with data from the database (Books.mdb) when Button is clicked.
Private Sub Button1_Click(ByVal sender As System.Object, ByVal e As _
System.EventArgs) Handles Button1.Click
DataSet11.Clear()
OleDbDataAdapter1.Fill(DataSet11)
End Sub
When you run the application and click the button, entire table or the columns you selected from the table will be displayed in the DataGrid. This is also a finest example of Complex Data Binding where we bound an entire data table to the data grid. Instead of displaying one data item at a time the data grid displayed entire data table at once. The image below displays an entire table in data grid.
Committing changes in a DataSet
As we make changes to records in a dataset by updating, inserting, and deleting records, the dataset maintains original and current versions of the records. Recall that the DataSet is an in-memory representation of data. All changes we do to records displayed in the data grid above are not committed back to the database. To commit all changes we do to records in dataset we need to call its AcceptChanges method. To do that, add one more button to the form and paste the following code in it's click event.
Private Sub Button2_Click(ByVal sender As System.Object, ByVal e As _
System.EventArgs) Handles Button2.Click
OleDbDataAdapter1.Update(DataSet11, "table1")
DataSet11.Table1.AcceptChanges()
End Sub
You can also call the Update method of the DataAdapter to commit changes back to the database. It looks like this in code: OleDbDataAdapter1.Update().
Customizing the DataGrid Control
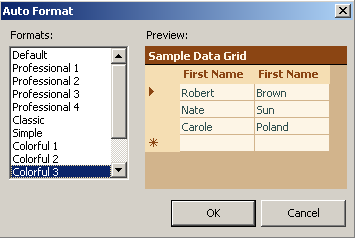
You can also customize the appearance of a data grid. You can customize the data grid by setting it's properties or by selecting the auto format dialog. To open the auto format dialog, right-click on the data grid and select Auto Format. You can also select it by clicking the Auto Format link found towards the bottom of the data grid properties window. The auto format dialog that opens looks like the image below.
As you can see from the auto format dialog image above you can set the style for the data grid from predefined formats. This dialog lets you select from a number of predefined styles for the data grid, setting header color, border color and so on.
Some of the common appearance and display properties of the data grid control as seen in the properties window are as follows.
Display Properties
CaptionVisible: Determines whether or not the caption area is displayed
ColumnHeadersVisible: Determines whether or not the column headers are displayed
RowHeadersVisible: Determines whether or not the row headers are visible
Appearance Properties
BorderStyle: Gets/Sets the appearance of the data grid border
CaptionFont: Gets/Sets the font that's used to display the text in the caption area
Captiontext: Gets/Sets the text that's displayed in the caption area
FlatMode: Determines whether or not the grid has a flat appearance
Font: Gets/Sets the font that's used to display the text in the data grid
GridLineStyle: Determines whether a solid line or no line is displayed between rows in the data grid
HeaderFont: Sets the font that's used to display the text in the row and column headers
Data Adapter Connection Wizard
Data Adapter Configuration Wizard
In this section we will create our own data adapter, a built-in feature that comes with Visual Basic .NET and work with it. We will create our own table and access data from the newly created table. To start, create a new database in Access, name it as Books, create a table, Table1 with some columns in it and make sure the database is in the C: drive of your machine. To start creating your own DataAdapter, open a blank form and add a button (Button1) and a DataGrid control to it from the toolbox. Our intention here is to display the table or some columns from the table which we created in Access in the DataGrid control when Button1 is clicked. To display that, click on the Data tab in the toolbox and double-click OleDbDataAdapter object. We are using OleDbDataAdapter here as we are working with an OleDb data source. After you select OleDbDataAdapter from the data tab in the toolbox it gets added to the component tray beneath the form and opens the Data Adapter Configuration Wizard dialogue which looks like the image below.
The DataAdapter Configuration wizard let's you customize your data adapter as you want, example, displaying the whole table or displaying selected columns from the table and so on. Click the next button in the Data Adapter Configuration wizard to select the data connection you want to use. The dialogue that opens look like the image below. It allows you to choose the data connection.
Since we are working with the table we created, click the "New Connection" button in this dialogue box which opens the Data Link properties window. The Data Link Properties window looks like the image below.
In the Data Link properties window, select the Provider tab and select "Microsoft Jet 4.0 OLE DB Provider" from the list of available providers. After selecting the provider, select the Connection tab. Click on the ellipse where it says "Select or enter a database name" and browse for the database on the local drive. Since we are working with our own database (Books.mdb) located on the C: drive select that. Click on the "Test Connection" button to test the connection and if the connection succeeds click OK. Clicking OK display a dialogue box like the image below.
It's at this stage we will generate the SQL Statements to be used with this data adapter. Click next on this dialog box which takes you to another dialogue box like the image below.
It's here we build our SQL Queries. We can display the entire table in the DataGrid or just some columns from the table. To display data, click on the Query Builder button on this dialog box to build your queries. Once you click that button a new dialog box opens up with a list that displays all the tables in the database with which we are working. In this case it displays only one table as we created only one table in the Books database. Select Table1 and click Add. Table1 is added to the Query Builder window. You can select entire table to be displayed in the DataGrid or just some columns. To display entire table in the DataGrid select the checkbox named "All Columns" in the small dialog named "Table1" which automatically builds the SQL statement for us. If you want to display specific columns from the table in the DataGrid check on the columns you want to display. Once you finish with your selection, click next. The dialogue box that opens when you click next looks like the image below.
This dialogue lists the configuration of the data adapter and the results. Click finish to close the Data Adapter Configuration wizard.
That creates the data adapter, DataAdapter1, we need. Next step is to create a DataSet and connect this DataSet to the DataGrid using the DataSource and DataMember properties.
NEXT>> Continue Reading
Using MSAccess with VB.NET
Data Access using MSAccess
To work with Microsoft Access we use the OleDb data Provider.
Sample Code
Create a database named Emp in Microsoft Access in the C: drive of your machine. In the Emp database create a table, Table1 with EmpNo, EName and Department as columns, insert some values in the table and close it. Open Visual Studio .NET, on a new form drag three TextBoxes and a Button. The following code will assume that TextBox1 is for EmpNo, TextBox2 is for EName and TextBox3 is for Department. Our intention is to retrieve data from Table1 in the Emp Database and display the values in these TextBoxes without binding when the Button is clicked.
Code for retrieving records
Imports System.Data.OleDb
Public Class Form1 Inherits System.Windows.Forms.Form
Dim cn As OleDbConnection
Dim cmd As OleDbCommand
Dim dr As OleDbDataReader
Private Sub Form1_Load(ByVal sender As System.Object, ByVal e as _
System.EventArgs) Handles MyBase.Load
End Sub
Private Sub Button1_Click(ByVal sender As System.Object, ByVal e As_
System.EventArgs) Handles Button1.Click
Try
cn = New OleDbConnection("Provider=Microsoft.Jet.OLEDB.4.0;_
Data Source=C:\emp.mdb;")
'provider to be used when working with access database
cn.Open()
cmd = New OleDbCommand("select * from table1", cn)
dr = cmd.ExecuteReader
While dr.Read()
TextBox1.Text = dr(0)
TextBox2.Text = dr(1)
TextBox3.Text = dr(2)
' loading data into TextBoxes by column index
End While
Catch
End Try
dr.Close()
cn.Close()
End Sub
End Class
When you run the code and click the Button, records from Table1 of the Emp database will be displayed in the TextBoxes.
Retrieving records with a Console Application
Imports System.Data.OleDb
Imports System.Console
Module Module1
Dim cn As OleDbConnection
Dim cmd As OleDbCommand
Dim dr As OleDbDataReader
Sub Main()
Try
cn = New OleDbConnection("Provider=Microsoft.Jet.OLEDB.4.0;Data Source=C:\emp.mdb;_
Persist Security Info=False")
cn.Open()
cmd = New OleDbCommand("select * from table1", cn)
dr = cmd.ExecuteReader
While dr.Read()
WriteLine(dr(0))
WriteLine(dr(1))
WriteLine(dr(2))
'writing to console
End While
Catch
End Try
dr.Close()
cn.Close()
End Sub
End Module
Code for Inserting a Record
Imports System.Data.OleDb
Public Class Form2 Inherits System.Windows.Forms.Form
Dim cn As OleDbConnection
Dim cmd As OleDbCommand
Dim dr As OleDbDataReader
Dim icount As Integer
Dim str As String
Private Sub Form2_Load(ByVal sender As System.Object, ByVal e As_
System.EventArgs) Handles MyBase.Load
End Sub
Private Sub Button1_Click(ByVal sender As System.Object, ByVal e As_
System.EventArgs) Handles Button2.Click
Try
cn = New OleDbConnection("Provider=Microsoft.Jet.OLEDB.4.0;Data Source=C:\emp.mdb;")
cn.Open()
str = "insert into table1 values(" & CInt(TextBox1.Text) & ",'" & TextBox2.Text & "','" &_
TextBox3.Text & "')"
'string stores the command and CInt is used to convert number to string
cmd = New OleDbCommand(str, cn)
icount = cmd.ExecuteNonQuery
MessageBox.Show(icount)
'displays number of records inserted
Catch
End Try
cn.Close()
End Sub
End Class
Using Oracle in VB.NET
Using OleDb Provider
The Objects of the OleDb provider with which we work are:
The OleDbConnection Class
The OleDbConnection class represents a connection to OleDb data source. OleDb connections are used to connect to most databases.
The OleDbCommand Class
The OleDbCommand class represents a SQL statement or stored procedure that is executed in a database by an OLEDB provider.
The OleDbDataAdapter Class
The OleDbDataAdapter class acts as a middleman between the datasets and OleDb data source. We use the Select, Insert, Delete and Update commands for loading and updating the data.
The OleDbDataReader Class
The OleDbDataReader class creates a data reader for use with an OleDb data provider. It is used to read a row of data from the database. The data is read as forward-only stream which means that data is read sequentially, one row after another not allowing you to choose a row you want or going backwards.
Sample Code
We will work with the sample Emp table in Oracle.
Retrieving Records
Imports System.Data.OleDB
Public Class Form1 Inherits System.Windows.Forms.Form
Dim myConnection As OleDbConnection
Dim myCommand As OleDbCommand
Dim dr As New OleDbDataReader()
'declaration
Private Sub Form1_Load(ByVal sender As System.Object, ByVal e As System.EventArgs)_
Handles MyBase.Load
myConnection = New OleDbConnection_
("Provider=MSDAORA.1;UserID=scott;password=tiger; database=ora")
'MSDORA is the provider when working with Oracle
Try
myConnection.Open()
'opening the connection
myCommand = New OleDbCommand("Select * from emp", myConnection)
'executing the command and assigning it to connection
dr = myCommand.ExecuteReader()
While dr.Read()
'reading from the datareader
MessageBox.Show("EmpNo" & dr(0))
MessageBox.Show("EName" & dr(1))
MessageBox.Show("Job" & dr(2))
MessageBox.Show("Mgr" & dr(3))
MessageBox.Show("HireDate" & dr(4))
'displaying data from the table
End While
dr.Close()
myConnection.Close()
Catch e As Exception
End Try
End Sub
End Class
The above code displays first 5 columns from the Emp table in Oracle.
Inserting Records
Drag a Button from the toolbox onto the Form. When this Button is clicked the values specified in code will be inserted into the Emp table.
Imports System.Data.OleDb
Public Class Form2 Inherits System.Windows.Forms.Form
Dim myConnection As OleDbConnection
Dim myCommand As OleDbCommand
Dim ra as Integer
'integer holds the number of records inserted
Private Sub Form2_Load(ByVal sender As System.Object, ByVal e As_
System.EventArgs) Handles MyBase.Load
End Sub
Private Sub Button1_Click(ByVal sender As System.Object, ByVal e As _
System.EventArgs) Handles Button1.Click
myConnection = New OleDbConnection(""Provider=MSDAORA.1;User_ ID=scott;password=tiger;database=ora")
Try
myConnection.Open()
myCommand = New OleDbCommand("Insert into emp values 12,'Ben','Salesman',300,_
12-10-2001,3000,500,10 ", myConnection)
'emp table has 8 columns. You can work only with the columns you want
ra=myCommand.ExecuteNonQuery()
MessageBox.Show("Records Inserted" & ra)
myConnection.Close()
Catch
End Try
End Sub
End Class
Deleting Records
Drag a Button on a new form and paste the following code.
Imports System.Data.OleDb
Public Class Form3 Inherits System.Windows.Forms.Form
Dim myConnection As OleDbConnection
Dim myCommand As OleDbCommand
Dim ra as Integer
Private Sub Form3_Load(ByVal sender As System.Object, ByVal e As_
System.EventArgs) Handles MyBase.Load
End Sub
Private Sub Button1_Click(ByVal sender As System.Object, ByVal e_
As System.EventArgs) Handles Button1.Click
Try
myConnection = New OleDbConnection(""Provider=MSDAORA.1;User_ ID=scott;password=tiger;database=ora")
myConnection.Open()
myCommand = New OleDbCommand("Delete from emp where DeptNo=790220",_
myConnection)
ra=myCommand.ExecuteNonQuery()
MessageBox.Show("Records Deleted" & ra)
myConnection.Close()
Catch
End Try
End Sub
End Class
Updating Records
Drag a Button on a new form and paste the following code.
Imports System.Data.OleDb
Public Class Form4 Inherits System.Windows.Forms.Form
Dim myConnection As OleDbConnection
Dim myCommand As OleDbCommand
Dim ra as Integer
Private Sub Form4_Load(ByVal sender As System.Object, ByVal e As_
System.EventArgs) Handles MyBase.Load
End Sub
Private Sub Button1_Click(ByVal sender As System.Object, ByVal e_
As System.EventArgs) Handles Button1.Click
Try
myConnection = New OleDbConnection(""Provider=MSDAORA.1;User_ ID=scott;password=tiger;database=ora")
myConnection.Open()
myCommand = New OleDbCommand("Update emp Set DeptNo=65 where DeptNo=793410",_ myConnection)
ra=myCommand.ExecuteNonQuery()
MessageBox.Show("Records Updated" & ra)
myConnection.Close()
Catch
End Try
End Sub
End Class
Using SQL SERVER to insert,delete and update in VB.NET
Inserting Records
The following code inserts a Record into the Jobs table in Pubs sample database. Drag a button onto the form and place the following code.
Imports System.Data.SqlClient
Public Class Form2 Inherits System.Windows.Forms.Form
Dim myConnection As SqlConnection
Dim myCommand As SqlCommand
Dim ra as Integer
'integer holds the number of records inserted
Private Sub Form2_Load(ByVal sender As System.Object, ByVal e_
As System.EventArgs) Handles MyBase.Load
End Sub
Private Sub Button1_Click(ByVal sender As System.Object, ByVal e_
As System.EventArgs) Handles Button1.Click
myConnection = New SqlConnection("server=localhost;uid=sa;pwd=;database=pubs")
'you need to provide password for sql server
myConnection.Open()
myCommand = New SqlCommand("Insert into Jobs values 12,'IT Manager',100,300,_
myConnection)
ra=myCommand.ExecuteNonQuery()
MessageBox.Show("New Row Inserted" & ra)
myConnection.Close()
End Sub
End Class
Deleting a Record
We will use Authors table in Pubs sample database to work with this code. Drag a button onto the form and place the following code.
Imports System.Data.SqlClient
Public Class Form3 Inherits System.Windows.Forms.Form
Dim myConnection As SqlConnection
Dim myCommand As SqlCommand
Dim ra as Integer
Private Sub Form3_Load(ByVal sender As System.Object, ByVal e_
As System.EventArgs) Handles MyBase.Load
End Sub
Private Sub Button1_Click(ByVal sender As System.Object, ByVal e_
As System.EventArgs) Handles Button1.Click
myConnection = New SqlConnection("server=localhost;uid=sa;pwd=;database=pubs")
'you need to provide password for sql server
myConnection.Open()
myCommand = New SqlCommand("Delete from Authors where city='Oakland'",_
myConnection)
'since no value is returned we use ExecuteNonQuery
ra=myCommand.ExecuteNonQuery()
MessageBox.Show("Records affected" & ra)
myConnection.Close()
End Sub
End Class
Updating Records
We will update a row in Authors table. Drag a button onto the form and place the following code.
Imports System.Data.SqlClient
Public Class Form4 Inherits System.Windows.Forms.Form
Dim myConnection As SqlConnection
Dim myCommand As SqlCommand
Dim ra as Integer
Private Sub Form4_Load(ByVal sender As System.Object, ByVal e_
As System.EventArgs) Handles MyBase.Load
End Sub
Private Sub Button1_Click(ByVal sender As System.Object, ByVal e_
As System.EventArgs) Handles Button1.Click
myConnection = New SqlConnection("server=localhost;uid=sa;pwd=;database=pubs")
'you need to provide password for sql server
myConnection.Open()
myCommand = New SqlCommand("Update Authors Set city='Oakland' where city=_
'San Jose' ",myConnection)
ra=myCommand.ExecuteNonQuery()
MessageBox.Show("Records affected" & ra)
myConnection.Close()
End Sub
End Class
Using DataReader And SQLServer
Using DataReaders, SQL Server
In this section we will work with databases in code. We will work with ADO .NET objects in code to create connections and read data using the data reader. We will see how to connect using our own connection objects, how to use the command object and so on. The namespace that needs to be imported when working with SQL Connections is System.Data.SqlClient. This section works with common database operations like insert, select, update and delete commands.
Working with SQL Server
When working with SQL Server the classes with which we work are described below.
The SqlConnection Class
The SqlConnection class represents a connection to SQL Server data source. We use OleDB connection object when working with databases other than SQL Server. Performance is the major difference when working with SqlConnections and OleDbConnections. Sql connections are said to be 70% faster than OleDb connections.
The SqlCommand Class
The SqlCommand class represents a SQL statement or stored procedure for use in a database with SQL Server.
The SqlDataAdapter Class
The SqlDataAdapter class represents a bridge between the dataset and the SQL Server database. It includes the Select, Insert, Delete and Update commands for loading and updating the data.
The SqlDataReader Class
The SqlDataReader class creates a data reader to be used with SQL Server.
DataReaders
A DataReader is a lightweight object that provides read-only, forward-only data in a very fast and efficient way. Using a DataReader is efficient than using a DataAdapter but it is limited. Data access with DataReader is
read-only, meaning, we cannot make any changes (update) to data and forward-only, which means we cannot go back to the previous record which was accessed. A DataReader requires the exclusive use of an active connection for the entire time it is in existence. We instantiate a DataReader by making a call to a Command object's ExecuteReader command. When the DataReader is first returned it is positioned before the first record of the result set. To make the first record available we need to call the Read method. If a record is available, the Read method moves the DataReader to next record and returns True. If a record is not available the Read method returns False. We use a While Loop to iterate through the records with the Read method.
Sample Code
Code to Retrieve Data using Select Command
The following code displays data from Discounts table in Pubs sample database.
Imports System.Data.SqlClient
Public Class Form1 Inherits System.Windows.Forms.Form
Dim myConnection As SqlConnection
Dim myCommand As SqlCommand
Dim dr As New SqlDataReader()
'declaring the objects
Private Sub Form1_Load(ByVal sender As System.Object, ByVal e As System.EventArgs)_
Handles MyBase.Load
myConnection = New SqlConnection("server=localhost;uid=sa;pwd=;database=pubs")
'establishing connection. you need to provide password for sql server
Try
myConnection.Open()
'opening the connection
myCommand = New SqlCommand("Select * from discounts", myConnection)
'executing the command and assigning it to connection
dr = myCommand.ExecuteReader()
While dr.Read()
'reading from the datareader
MessageBox.Show("discounttype" & dr(0).ToString())
MessageBox.Show("stor_id" & dr(1).ToString())
MessageBox.Show("lowqty" & dr(2).ToString())
MessageBox.Show("highqty" & dr(3).ToString())
MessageBox.Show("discount" & dr(4).ToString())
'displaying the data from the table
End While
dr.Close()
myConnection.Close()
Catch e As Exception
End Try
End Sub
End Class
The above code displays records from discounts table in MessageBoxes.
Retrieving records with a Console Application
Imports System.Data.SqlClient
Imports System.Console
Module Module1
Dim myConnection As SqlConnection
Dim myCommand As SqlCommand
Dim dr As SqlDataReader
Sub Main()
Try
myConnection = New SqlConnection("server=localhost;uid=sa;pwd=;database=pubs")
'you need to provide password for sql server
myConnection.Open()
myCommand = New SqlCommand("Select * from discounts", myConnection)
dr = myCommand.ExecuteReader
Do
While dr.Read()
WriteLine(dr(0))
WriteLine(dr(1))
WriteLine(dr(2))
WriteLine(dr(3))
WriteLine(dr(4))
' writing to console
End While
Loop While dr.NextResult()
Catch
End Try
dr.Close()
myConnection.Close()
End Sub
End Module
NEXT>>inserting,updating and deleting
In this section we will work with databases in code. We will work with ADO .NET objects in code to create connections and read data using the data reader. We will see how to connect using our own connection objects, how to use the command object and so on. The namespace that needs to be imported when working with SQL Connections is System.Data.SqlClient. This section works with common database operations like insert, select, update and delete commands.
Working with SQL Server
When working with SQL Server the classes with which we work are described below.
The SqlConnection Class
The SqlConnection class represents a connection to SQL Server data source. We use OleDB connection object when working with databases other than SQL Server. Performance is the major difference when working with SqlConnections and OleDbConnections. Sql connections are said to be 70% faster than OleDb connections.
The SqlCommand Class
The SqlCommand class represents a SQL statement or stored procedure for use in a database with SQL Server.
The SqlDataAdapter Class
The SqlDataAdapter class represents a bridge between the dataset and the SQL Server database. It includes the Select, Insert, Delete and Update commands for loading and updating the data.
The SqlDataReader Class
The SqlDataReader class creates a data reader to be used with SQL Server.
DataReaders
A DataReader is a lightweight object that provides read-only, forward-only data in a very fast and efficient way. Using a DataReader is efficient than using a DataAdapter but it is limited. Data access with DataReader is
read-only, meaning, we cannot make any changes (update) to data and forward-only, which means we cannot go back to the previous record which was accessed. A DataReader requires the exclusive use of an active connection for the entire time it is in existence. We instantiate a DataReader by making a call to a Command object's ExecuteReader command. When the DataReader is first returned it is positioned before the first record of the result set. To make the first record available we need to call the Read method. If a record is available, the Read method moves the DataReader to next record and returns True. If a record is not available the Read method returns False. We use a While Loop to iterate through the records with the Read method.
Sample Code
Code to Retrieve Data using Select Command
The following code displays data from Discounts table in Pubs sample database.
Imports System.Data.SqlClient
Public Class Form1 Inherits System.Windows.Forms.Form
Dim myConnection As SqlConnection
Dim myCommand As SqlCommand
Dim dr As New SqlDataReader()
'declaring the objects
Private Sub Form1_Load(ByVal sender As System.Object, ByVal e As System.EventArgs)_
Handles MyBase.Load
myConnection = New SqlConnection("server=localhost;uid=sa;pwd=;database=pubs")
'establishing connection. you need to provide password for sql server
Try
myConnection.Open()
'opening the connection
myCommand = New SqlCommand("Select * from discounts", myConnection)
'executing the command and assigning it to connection
dr = myCommand.ExecuteReader()
While dr.Read()
'reading from the datareader
MessageBox.Show("discounttype" & dr(0).ToString())
MessageBox.Show("stor_id" & dr(1).ToString())
MessageBox.Show("lowqty" & dr(2).ToString())
MessageBox.Show("highqty" & dr(3).ToString())
MessageBox.Show("discount" & dr(4).ToString())
'displaying the data from the table
End While
dr.Close()
myConnection.Close()
Catch e As Exception
End Try
End Sub
End Class
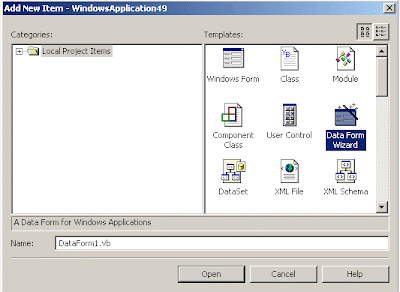
The above code displays records from discounts table in MessageBoxes.
Retrieving records with a Console Application
Imports System.Data.SqlClient
Imports System.Console
Module Module1
Dim myConnection As SqlConnection
Dim myCommand As SqlCommand
Dim dr As SqlDataReader
Sub Main()
Try
myConnection = New SqlConnection("server=localhost;uid=sa;pwd=;database=pubs")
'you need to provide password for sql server
myConnection.Open()
myCommand = New SqlCommand("Select * from discounts", myConnection)
dr = myCommand.ExecuteReader
Do
While dr.Read()
WriteLine(dr(0))
WriteLine(dr(1))
WriteLine(dr(2))
WriteLine(dr(3))
WriteLine(dr(4))
' writing to console
End While
Loop While dr.NextResult()
Catch
End Try
dr.Close()
myConnection.Close()
End Sub
End Module
NEXT>>inserting,updating and deleting
Subscribe to:
Posts (Atom)