Generating DataSet
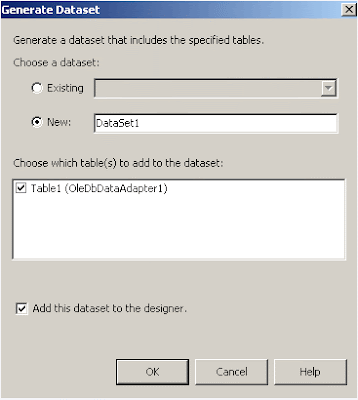
To generate a DataSet, select Data->Generate DataSet from the main menu. From the dialog that opens, as shown in the image below, select new and check the checkbox for Table1 and also check the checkbox where it says "add this dataset to the designer" and click OK. Once you click OK, you can see the DataSet, DataSet11 being added to the component tray.

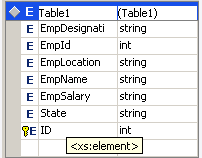
You can also see the XML schema file named DataSet1.xsd that is generated to define the DataSet. You can double-click this file in Solution Explorer window if you want to see the schema code. This file is generated because ADO .NET transfers data in XML format. The image below displays that.

Binding Controls to the DataSet
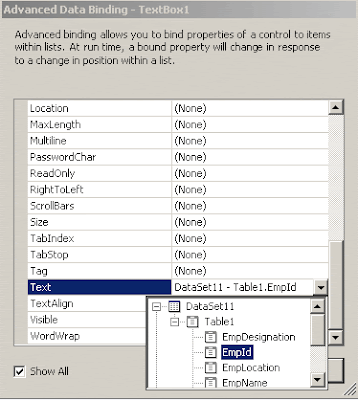
We are now ready to bind textboxes to this dataset. We will bind the text property of textboxes to data columns in table1. Select TextBox1, open it's properties and under Data Bindings, select Advanced and click on the ellipse to open the Advanced Data Binding window for the textbox. It looks like the image below.

As shown in the image above, select Text property, click on the drop-down arrow, double-click DataSet11 which opens Table1. Double-click Table1 to list all columns in the table. Here, you select the column you want to display in this textbox. Once you finish selecting the column click close. Repeat the process for remaining textboxes until all columns in Table1 are accommodated. Once you finish with all textboxes, we need to write code for buttons to finish our data-entry form. Switch to code view and place the following code. Make sure you place code correctly for each button.
Public Class Form1 Inherits System.Windows.Forms.Form
#Region " Windows Form Designer generated code "
#End Region
Private Sub Form1_Load(ByVal sender As System.Object, ByVal e As System.EventArgs)_
Handles MyBase.Load
'data binding demo
End Sub
Private Sub Load_Click(ByVal sender As System.Object, ByVal e As _
System.EventArgs) Handles Load.Click
OleDbDataAdapter1.Fill(DataSet11)
'filling the dataset and loading records into the textboxes
End Sub
Private Sub Update_Click(ByVal sender As System.Object, ByVal e As _
System.EventArgs) Handles Update.Click
Try
Me.BindingContext(DataSet11, "table1").EndCurrentEdit()
Me.OleDbDataAdapter1.Update(DataSet11)
'ending current editing and updating the dataset
Catch
End Try
End Sub
Private Sub Insert_Click(ByVal sender As System.Object, ByVal e As _
System.EventArgs) Handles Insert.Click
Me.BindingContext(DataSet11, "table1").AddNew()
'adding new record/row to the table
MsgBox("Successfully Inserted")
End Sub
Private Sub Clear_Click(ByVal sender As System.Object, ByVal e As _
System.EventArgs) Handles Clear.Click
TextBox1.Text = " "
TextBox2.Text = " "
TextBox3.Text = " "
TextBox4.Text = " "
TextBox5.Text = " "
'setting all textboxes to null
End Sub
Private Sub First_Click(ByVal sender As System.Object, ByVal e As _
System.EventArgs) Handles First.Click
Me.BindingContext(DataSet11, "table1").Position = 0
'using forms's BindingContext property's position member and setting it to 0
'displays the first row from table
End Sub
Private Sub NextRec_Click(ByVal sender As System.Object, ByVal e As _
System.EventArgs) Handles NextRec.Click
Me.BindingContext(DataSet11, "table1").Position = Me.BindingContext(DataSet11,_
"table1"). Position + 1
'incrementing the position property of the binding context
End Sub
Private Sub Previous_Click(ByVal sender As System.Object, ByVal e As _
System.EventArgs) Handles Previous.Click
Me.BindingContext(DataSet11, "table1").Position = Me.BindingContext(DataSet11,_
"table1"). Position - 1
End Sub
Private Sub Last_Click(ByVal sender As System.Object, ByVal e As _
System.EventArgs) Handles Last.Click
Me.BindingContext(DataSet11, "table1").Position = Me.BindingContext(DataSet11,_
"table1"). Count - 1
'the count property returns the total number of records in the table
End Sub
End Class
After finishing with the code, run the application
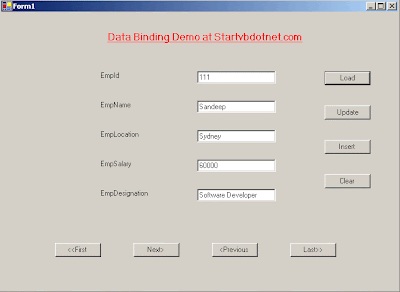
and click Load button. The first row from table1 will be displayed in textboxes. The image below displays that.
After finishing with the code, run the application and click Load button. The first row from table1 will be displayed in textboxes. The image below displays that.

You can now move to the last row, next row, previous row, etc or modify your records, insert new records etc. Try experimenting with other controls following the same procedure.
CurrencyManager Object
Based on the code above, this is for understanding. Navigation of records and updating of data-bound controls is managed in the data layer as discussed above. Every data source manages navigation with a CurrencyManager object. The CurrencyManager object keeps track of a current record for a particular data source. An application can interact with more than one data source at a given time. Each data source maintains it's own CurrencyManager. Since there can be multiple data sources represented on a single form at any given time, each form manages the CurrencyManager objects associated with those data sources through the central object called the BindingContext. The BindingContext organizes and exposes the CurrencyManager objects associated with each data source. We can use the BindingContext property of each form to manage the position of each record for data source. We access a particular CurrencyManager by supplying the BindingContext property of the CurrencyManager. When navigating records, the current record can be set by setting the Position property for a particular BindingContext.
Simple Binding in Code
We can also perform simple binding in code using the control's DataBindings property. Say, we want to bind the textbox to the EmpID column in code. We can do that using the collection's Add method by passing this method the property to bind, the data source to use and the specific column we want to bind. The code for that looks like this:
TextBox1.DataBindings.Add("Text", DataSet11, "table1.empid").
No comments:
Post a Comment